How Detergent Residue Build-Up Causes False Optical Sensor Readings in Dishwasher Turbidity Systems
How Detergent Residue Build-Up Causes False Optical Sensor Readings in Dishwasher Turbidity Systems
Few dishwasher problems are as perplexing as those involving protracted cycles, repeated rinses for no apparent reason, or foggy coating on clean dishes despite a clean filter and freely rotating spray arms. For many modern dishwashers, the problem is a turbidity sensor that has been deceived by detergent residue. This little optical apparatus observes the water transparency and communicates to the control board the washing time and number of rinsings. A tiny layer of soap scum, mineral film, or undissolved detergent might build up on the lens, and the sensor does not perceive the water properly and provides false signals to the electronics. The machine may then waste water, electricity and time, or it may cut a cycle short before the dishes are really clean. This page covers turbidity system operation, residue buildup, incorrect readings and how to detect, clean and prevent the problem.
How Turbidity Sensors Determine Water Clarity in Dishwashers
A turbidity sensor is an optical device that estimates the amount of suspended soil that is floating in the wash water. An infrared light emitter shoots a beam across a brief gap of water to a receiving photodiode or phototransistor in a compact enclosure. Clean water allows most of the light to get through, and the receiver gets a strong signal. Water with food particles, fat or starch reflects and absorbs the beam, weakening the signal. The board checks the reading with stored reference values and then changes the wash time, water temperature and number of rinse phases. Since the sensor operates by comparing light levels it needs clean lenses and a stable baseline. Any change in the intensity of the light reaching the receiver not due to unclean water itself will be regarded as a change in soil level.
How Detergent Residue Contaminates Sensor Surfaces
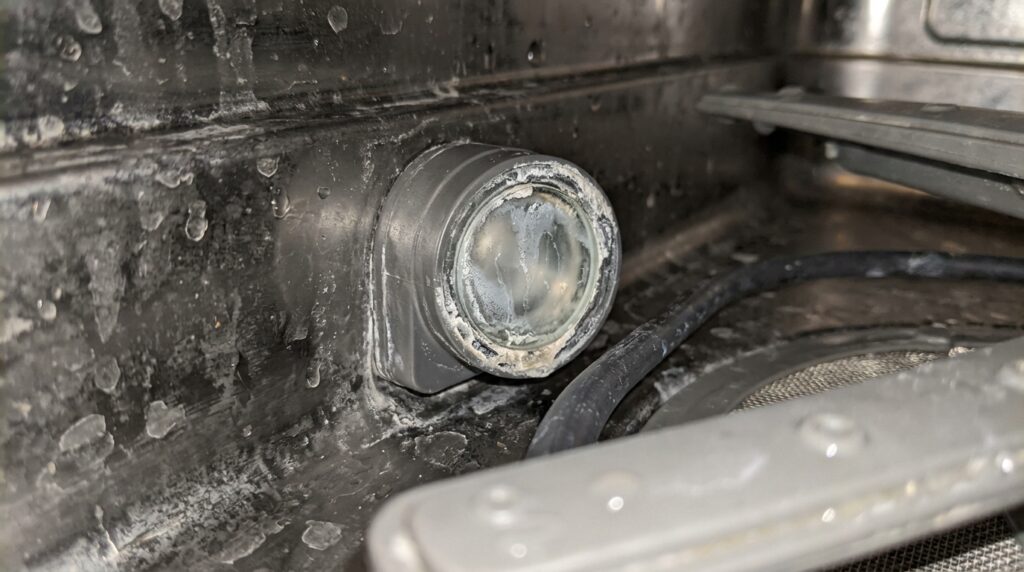
Detergent residue is the film left behind when cleaning chemicals aren’t fully dissolved or rinsed away. Powders have fillers and binders that may leave a chalky film, while gels and tablets can leave a sticky, foggy film if they dissolve slowly in cool water. Hard water makes it worse, since calcium and magnesium combine with soap components and create a persistent scale. This coating will catch grease and fine food particles and will harden it more with each cycle. The sensor is at the bottom (and slowest) point in the water channel, where silt settles down and the rinse water has less force to flush it out. In a few weeks or months, a scarcely perceptible haze can develop into an opaque film that obscures a substantial portion of the light beam.
How a Film on the Lens Can Affect Optical Readings
When there is residue on the emitter, receiver, or both, the sensor will pick up a weaker signal although the water is totally clean. When the control board detects light that is obstructed by soap film the water is unclean. This can result in the dishwasher taking longer to wash, heating the water for longer, and running extra rinses that never improve the reading. Another type of error can be introduced at the start of the cycle, while the board is doing a calibration check. If it reads a coated lens as its clean water baseline, then each subsequent measurement is offset and truly unclean water may look okay. Both are false readings and both delivers unsatisfactory results, either in lost energy or inadequate cleaning.
Excess Residue – Common Causes Overdosing Hard Water Low Temperatures etc.
The number one cause of residue is overuse of detergent, since current machines need a lot less product than most think. More soap doesn’t clean better, it just leaves a surplus in the sump and all over everything it touches. Hard water compounds the problem by diminishing the effectiveness of the detergent, which encourages owners to add even more. Low temperature of the incoming water can inhibit the complete dissolution of tablets and powders, especially during short eco cycles. Soap can also be left behind on overloaded racks, blocked spray arms and lacking rinse aid, because rinse aid helps water sheet off surfaces. When you change detergent brands, use old tablets, or put pods in a moist dispenser, you can end up with clumps. Because cleaning won’t stop it from coming back, it’s important to identify the exact habit driving the buildup.
Symptoms of false turbidity readings in the wash cycles
The most obvious indication is an unpredictable cycle. A conventional wash can be well over two hours, an auto cycle can repeat rinse phases, or the display can linger on the same step without advancing. Other owners see the other side, with short cycles that terminate while glasses are still streaky and plates are still gritty. A white film on the glassware, a soapy scent, and froth in the tub after the final rinse are other signs that residue is building up throughout the machine. Some models will show a sensor fault code or will go into a default mode where they ignore the sensor completely and run a predetermined program. If the symptoms are present at the same time and the filter, pump and spray arms are clear then the sensor is the prime suspect.
Sensor Location, Access, and Safe Inspection Procedures
Usually the turbidity sensor is installed in the sump area, near the drain pump or in the recirculation circuit where wash water is constantly flowing. In some models it is positioned beneath the filter assembly, while in others it is incorporated into the heater or pump housing and is only accessible after removing the lower panel. Before working on it, turn off the power and water. A dishwasher is a combination of electricity and standing water. Remove the lower rack and filter and use a flashlight to look for a little plastic window or lens with a wire connector connected. Look for cloudiness, a chalky crust, or a slimy film on the surface. Are the wiring and connector clean and dry? Refer to the service manual for your model before removing any panels.
Calibration Checks and Cleaning Procedures to Restore Accuracy
Be cautious when cleaning. A scratch on a plastic lens will scatter light just as much as dirt. Wipe the surface with a soft cloth or cotton swab wet with warm water and a little white vinegar, which dissolves mineral scale and lifts soap film. For thicker accumulation, run a hot cycle with nothing in it and a cup of white vinegar or a dishwasher cleaner with citric acid in it. Run a second plain hot cycle to flush the residual acid out. Do not use abrasive pads, powerful solvents or chlorine bleach, which can fog the plastic or damage seals. Clean it off. Run a normal cycle and see what happens. Many machines will automatically re-calibrate the sensor, but some will need to be put into a service diagnostic mode, which can be found in the owners documentation.
Prevention Strategies & When to Change Sensor
Prevention starts with proper dose. Follow the directions of the detergent manufacturer, and if your water is soft reduce the amount, and do not mix powders, gels and tablets in the same cycle. Always use rinse aid and run a hot water cycle at least once a month to help break down the film that builds up. If you’re in an area with hard water, consider installing a water softener or dishwashing salt system. Make sure that the incoming water is hot enough before the cycle begins. Every few weeks, clean the filter to prevent loose dirt from building up around the sensor. If cleaning does not restore the cycle times to normal or you still see sensor problems, the component may have aged or been electrically damaged. Usually, replacement is inexpensive, but first a technician should check the problem.