Mastering Precision: An In-Depth Exploration of Orthographic Projection in AutoCAD

Introduction:
Orthographic projection, a cornerstone of technical drawing and design, plays a pivotal role in transforming three-dimensional objects into two-dimensional representations. In the realm of computer-aided design (CAD), AutoCAD stands as a powerful tool that seamlessly integrates the principles of orthographic projection. In this extensive exploration, we will delve into the intricacies of orthographic projection in AutoCAD, unraveling its significance, applications, and the methodologies employed to achieve precision in technical drawings.
Understanding Orthographic Projection:
- Definition:
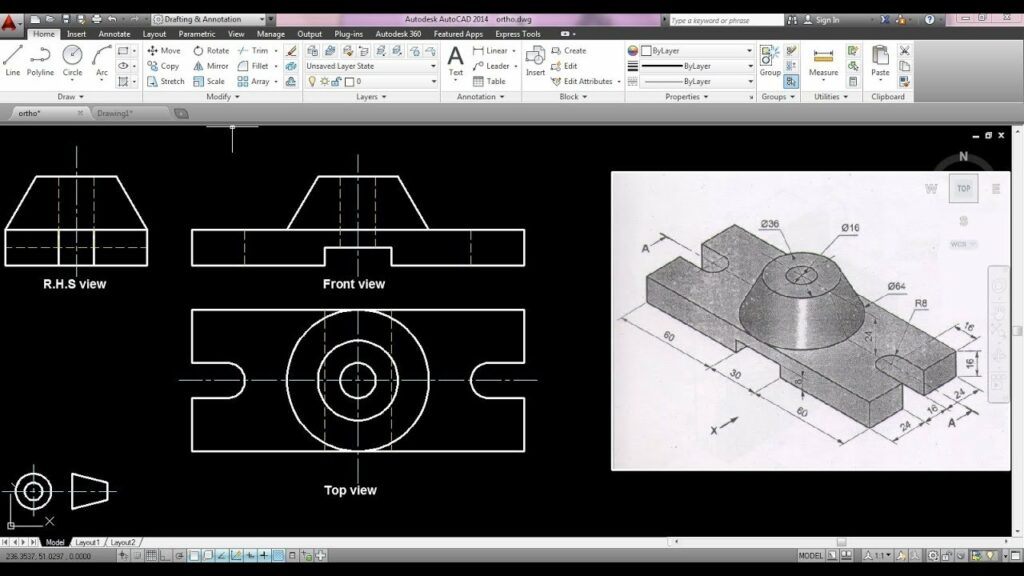
- Orthographic projection is a systematic method of representing three-dimensional objects on a two-dimensional plane. It utilizes multiple views, typically front, top, and side views, to provide a comprehensive and accurate depiction of an object’s shape, size, and details.
- Multiview Projection:
- In orthographic projection, the object is viewed from different directions to capture its various dimensions. Common views include the front, top, right, left, bottom, and rear, with each view presenting a unique perspective of the object.
- Primary Orthographic Views:
- The three primary orthographic views are:
- Front View: The view facing the observer, showcasing the object’s width and height.
- Top View: The view looking down on the object, revealing its plan or footprint.
- Right Side View: The view from the right side, highlighting the object’s depth.
- The three primary orthographic views are:
Orthographic Projection in AutoCAD:
- Setting Up Orthographic Views:
- AutoCAD facilitates the creation of orthographic projections by providing tools to set up multiple views of an object. Users can utilize the ViewCube or create custom views to establish the necessary perspectives.
- Creating Multiview Drawings:
- AutoCAD allows users to generate multiview drawings efficiently. By leveraging the layout and paper space features, designers can organize and arrange multiple orthographic views on a single sheet for clear and comprehensive documentation.
- Viewport Configuration:
- Viewports in AutoCAD enable users to display different views within the same layout. Configuring viewports is essential for presenting multiple orthographic views simultaneously, enhancing the clarity of the drawing.
- Creating 2D Geometry:
- Utilizing basic AutoCAD drawing tools, designers can accurately create 2D representations of the object in each orthographic view. Lines, circles, and hatching are among the essential elements used to depict features and details.
- Dimensioning in Orthographic Projections:
- Dimensioning plays a crucial role in orthographic projections, providing precise measurements for the object’s various dimensions. AutoCAD offers dimensioning tools that allow users to add and customize dimensions based on project requirements.
Applications of Orthographic Projection in AutoCAD:
- Engineering and Manufacturing:
- Orthographic projections are extensively used in engineering and manufacturing industries to convey detailed information about components and assemblies. Engineers rely on accurate multiview drawings to guide the production process.
- Architectural Design:
- Architects utilize orthographic projection in AutoCAD to communicate design concepts, floor plans, and elevations. Multiview drawings are instrumental in conveying spatial relationships and design intent to builders and stakeholders.
- Product Design and Prototyping:
- In product design, orthographic projections aid in creating precise drawings for prototypes and manufacturing. Designers can use AutoCAD to generate detailed views that guide the fabrication of complex components.
- Construction Documentation:
- Orthographic projections play a crucial role in construction documentation, providing builders and contractors with detailed drawings that showcase the dimensions and specifications of structures and components.
- Educational Purposes:
- AutoCAD’s application of orthographic projection is instrumental in education and training. Students and professionals alike use AutoCAD to learn and practice the principles of technical drawing and design.
Best Practices for Orthographic Projection in AutoCAD:
- Consistent Line Weights:
- Maintaining consistent line weights in orthographic projections enhances the clarity and readability of the drawing. Important lines such as object outlines and visible edges should have distinct weights.
- Layer Organization:
- Employing a well-organized layer structure in AutoCAD helps categorize and control the visibility of different elements in the drawing. Each orthographic view should have its designated layers for efficient management.
- Use of Orthographic Symbols:
- Incorporating standard orthographic symbols, such as hidden lines, centerlines, and section lines, contributes to the precision and industry-standard representation of the drawing.
- Annotation and Labeling:
- Thorough annotation and labeling ensure that the orthographic projection provides comprehensive information. Dimensions, labels, and notes should be strategically placed for clarity and ease of understanding.
- Scale Considerations:
- Paying attention to scale is crucial when working with orthographic projections. Ensuring consistency in scale across different views maintains accuracy and coherence in the drawing.
Conclusion:
Orthographic projection in AutoCAD is a fundamental skill that empowers designers, engineers, and architects to translate complex three-dimensional concepts into clear and detailed two-dimensional representations.


