Crafting Connectivity: A Comprehensive Guide to Setting Up a Wireless Ad-Hoc Network in Windows 7
In today’s interconnected world, the ability to create a wireless network on the fly can be invaluable. Whether you’re sharing files with colleagues, collaborating on a project with classmates, or gaming with friends, setting up a wireless ad-hoc network in Windows 7 offers a convenient and flexible solution. Windows 7 provides built-in tools to create ad-hoc networks effortlessly, allowing users to connect multiple devices wirelessly without the need for a dedicated router or access point. In this comprehensive guide, we will delve deep into the intricacies of setting up a wireless ad-hoc network in Windows 7, providing step-by-step instructions, advanced techniques, and practical insights to help you craft connectivity and enable seamless collaboration.
Understanding Wireless Ad-Hoc Networks:
Before delving into the process of setting up a wireless ad-hoc network, let’s first grasp the concept and significance of this networking solution:
- On-the-Go Connectivity: A wireless ad-hoc network allows users to connect multiple devices wirelessly without relying on a traditional router or access point.
- Peer-to-Peer Communication: In an ad-hoc network, devices communicate directly with each other, enabling seamless peer-to-peer communication and collaboration.
- Flexibility and Convenience: Setting up a wireless ad-hoc network provides users with flexibility and convenience, making it ideal for temporary networking scenarios such as meetings, presentations, or gaming sessions.
Accessing Network and Sharing Center in Windows 7:
Now, let’s explore how to access and navigate Network and Sharing Center in Windows 7:
- Accessing Network and Sharing Center:
- Click on the network icon in the system tray (located in the bottom-right corner of the screen).
- Select “Open Network and Sharing Center” from the menu that appears.
- Navigating Network and Sharing Center:
- Network and Sharing Center provides access to various network-related tasks and settings, including setting up a new connection or network.
Setting Up a Wireless Ad-Hoc Network:
Now that we’ve accessed Network and Sharing Center, let’s explore how to set up a wireless ad-hoc network in Windows 7:
- Accessing Set Up a New Connection or Network:
- In Network and Sharing Center, click on the “Set up a new connection or network” option.
- Select “Set up a wireless ad-hoc network” from the list of available connection options.
- Configuring Ad-Hoc Network Settings:
- Follow the on-screen prompts to configure the settings for your ad-hoc network, including the network name (SSID) and security type.
- Choose a security type (e.g., WEP, WPA2-Personal) and enter a passphrase to secure your ad-hoc network.
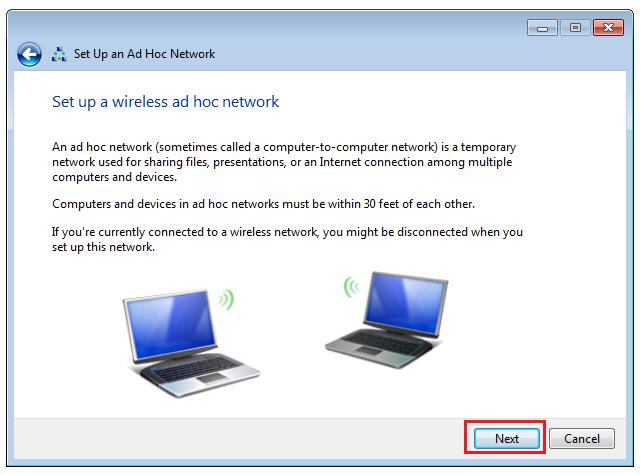
- Completing the Setup Process:
- Once you’ve configured the settings for your ad-hoc network, click on the “Next” button to proceed.
- Windows 7 will create and configure the ad-hoc network, and you will receive a notification once the setup process is complete.
Connecting Devices to the Ad-Hoc Network:
Now that you’ve set up the ad-hoc network, let’s explore how to connect devices to the network:
- On Other Devices:
- On the device you wish to connect to the ad-hoc network, open the list of available wireless networks.
- Locate the ad-hoc network you created and select it from the list.
- Enter the security passphrase when prompted, and click on “Connect” to join the ad-hoc network.
- Verification:
- Once connected, the device will be able to communicate with other devices on the ad-hoc network, enabling seamless peer-to-peer communication and collaboration.
Advanced Features and Tips:
To further enhance your experience with setting up a wireless ad-hoc network in Windows 7, consider the following advanced features and tips:
- Network Security:
- Choose a strong security type and passphrase to protect your ad-hoc network from unauthorized access.
- Regularly review and update the security settings of your ad-hoc network to ensure maximum protection.
- Device Compatibility:
- Ensure that all devices you wish to connect to the ad-hoc network support wireless networking and are compatible with the security settings you’ve configured.
- Signal Strength and Range:
- Keep in mind that the range and signal strength of your ad-hoc network may vary depending on factors such as distance, obstacles, and interference.
- Position devices within close proximity to each other for optimal connectivity and performance.
- Troubleshooting:
- If you encounter issues with connecting to or using the ad-hoc network, troubleshoot the problem by checking network settings, signal strength, and device compatibility.
- Refer to Windows 7’s built-in troubleshooting tools or consult online resources for assistance.
Conclusion:
Setting up a wireless ad-hoc network in Windows 7 provides users with a convenient and flexible solution for establishing peer-to-peer communication and collaboration. By following the comprehensive guide outlined above, users can effectively create and configure ad-hoc networks, connect devices wirelessly, and enable seamless collaboration in various scenarios. Whether you’re sharing files, collaborating on projects, or gaming with friends, a wireless ad-hoc network offers the flexibility and convenience to connect multiple devices without the need for a dedicated router or access point. So embrace the power of connectivity, master the art of crafting wireless ad-hoc networks in Windows 7, and unlock new possibilities for collaboration and communication in the digital age.


