Mastering the Ripple Trim Tool: A Comprehensive Guide for Final Cut Pro Users
Final Cut Pro, renowned for its intuitive interface and powerful editing capabilities, offers a plethora of tools to streamline the editing process. Among these, the Ripple Trim Tool stands out as a fundamental feature that allows editors to make precise adjustments to the timing and duration of clips with ease and efficiency. In this comprehensive guide, we’ll delve deep into the intricacies of the Ripple Trim Tool in Final Cut Pro, exploring its functionalities, applications, and best practices to help you become a proficient editor.
Understanding the Ripple Trim Tool:
The Ripple Trim Tool in Final Cut Pro is a versatile editing tool designed to adjust the duration of clips while simultaneously trimming adjacent clips to maintain the overall timeline duration. Unlike traditional trimming methods that leave gaps or overlaps when adjusting clip lengths, the Ripple Trim Tool automatically ripples or ripples adjacent clips to preserve the continuity of the timeline.
Basic Functionality:
To use the Ripple Trim Tool in Final Cut Pro, simply select the clip you want to trim in the timeline and position the playhead at the desired edit point. Then, activate the Ripple Trim Tool by pressing the “T” key on your keyboard or selecting it from the toolbar.
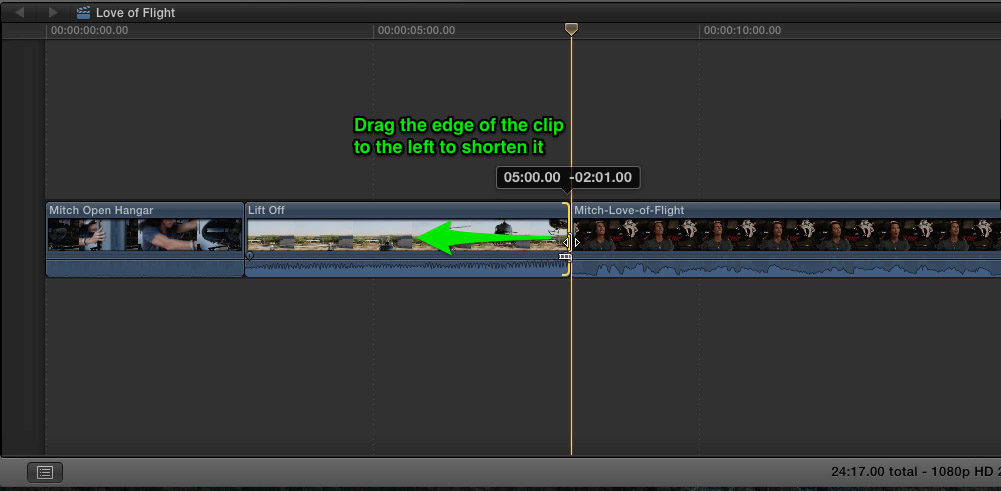
Once the Ripple Trim Tool is active, click and drag the edge of the clip you want to trim. As you drag, Final Cut Pro will dynamically adjust the duration of the selected clip while simultaneously trimming the adjacent clips to maintain the overall timeline duration. This ensures that there are no gaps or overlaps in the timeline, preserving the flow and continuity of your edit.
Advanced Techniques:
While the basic functionality of the Ripple Trim Tool is straightforward, Final Cut Pro offers several advanced techniques and shortcuts to streamline the editing process and achieve more precise results.
- Keyboard Shortcuts: To speed up your workflow, familiarize yourself with the keyboard shortcuts for the Ripple Trim Tool. Pressing “T” activates the Ripple Trim Tool, while holding down the Option key (⌥) allows you to perform asymmetric trims, trimming only the outgoing or incoming side of the clip.
- Precision Trimming: For more precise trimming, enable the Precision Editor by double-clicking on the edit point or pressing the Command key (⌘) and the \ key simultaneously. The Precision Editor provides a visual representation of the adjacent clips, allowing you to fine-tune the edit point and adjust the timing with pixel-perfect accuracy.
- Trimming Multiple Clips: You can use the Ripple Trim Tool to trim multiple clips simultaneously by selecting multiple clips in the timeline before activating the tool. This allows you to maintain the synchronization and timing of multiple clips while making adjustments to their durations.
- Trimming Ripple Across Tracks: In Final Cut Pro, you can ripple trim across multiple tracks simultaneously by activating the Ripple Trim Tool and dragging the edit point vertically across the tracks. This allows you to maintain synchronization between video, audio, and other elements in your edit while adjusting clip durations.
Best Practices:
To make the most of the Ripple Trim Tool in Final Cut Pro, consider the following best practices:
- Plan Ahead: Before making any edits, take the time to plan your edit and visualize the desired outcome. Understanding the flow and pacing of your project will help you make informed decisions when using the Ripple Trim Tool.
- Use Keyboard Shortcuts: Learning and utilizing keyboard shortcuts for the Ripple Trim Tool will significantly speed up your editing workflow and improve efficiency.
- Experiment and Iterate: Don’t be afraid to experiment with different trimming techniques and approaches to find the best solution for your project. Iterate on your edits and fine-tune the timing until you achieve the desired result.
- Practice Regularly: Like any skill, proficiency with the Ripple Trim Tool comes with practice. Take the time to familiarize yourself with its functionalities and incorporate it into your editing workflow regularly to improve your efficiency and precision.
Conclusion:
In conclusion, the Ripple Trim Tool in Final Cut Pro is a powerful editing tool that allows editors to make precise adjustments to clip durations while maintaining the continuity of the timeline. By understanding its functionalities, mastering keyboard shortcuts, and incorporating best practices into your workflow, you can harness the full potential of the Ripple Trim Tool to elevate your editing projects to new heights of professionalism and polish. Whether you’re a seasoned editor or just starting, mastering the Ripple Trim Tool will undoubtedly enhance your editing skills and streamline your workflow in Final Cut Pro.