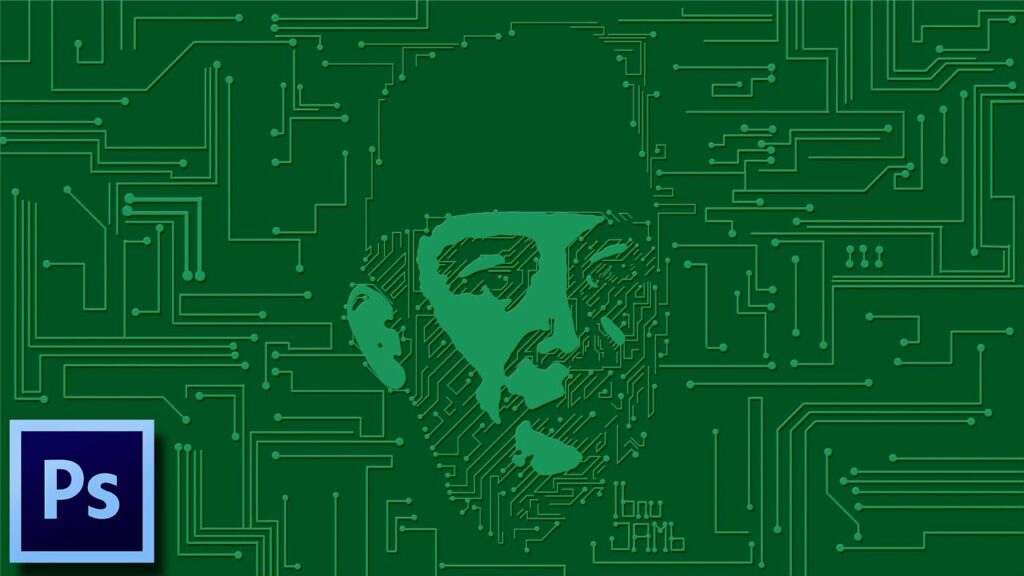
Illuminating Creativity: A Comprehensive Tutorial on Creating a Printed Circuit Board (PCB) Portrait in Photoshop
Introduction:
In the intersection of art and technology, the creation of a Printed Circuit Board (PCB) portrait stands as a testament to the fusion of creativity and digital design. This comprehensive tutorial will guide you through the intricate process of transforming a portrait into a visually captivating PCB-inspired masterpiece using Adobe Photoshop. From conceptualization to execution, let’s embark on a journey that illuminates the potential of digital artistry.
Chapter 1: Conceptualizing the PCB Portrait
- Understanding PCB Aesthetics:
- Explore the characteristics of Printed Circuit Boards, focusing on the intricate patterns, traces, and components that define their visual identity.
- Selecting a Portrait:
- Choose a high-resolution portrait as the base for your PCB-inspired artwork. Consider images with clear details to enhance the final result.
Chapter 2: Setting Up Your Canvas
- Creating a New Document:
- Open Adobe Photoshop and create a new document with dimensions suitable for your desired output. Ensure a high resolution for detailed artwork.
- Importing the Portrait:
- Place the selected portrait onto the canvas as the foundation for your PCB-inspired design.
Chapter 3: Converting to Grayscale and Adjusting Levels
- Convert to Grayscale:
- Transform the image into grayscale to simplify the color palette and focus on the tones and contrasts.
- Adjusting Levels:
- Fine-tune the levels to enhance the highlights and shadows, ensuring a well-balanced grayscale image.
Chapter 4: Outlining the Portrait
- Creating a New Layer for Outlines:
- Generate a new layer dedicated to the PCB-inspired outlines.
- Using the Pen Tool:
- Employ the Pen Tool to meticulously trace the contours of the portrait, incorporating circuit-like patterns.
- Experimenting with Line Thickness:
- Vary the thickness of the lines to add depth and dimension to the PCB-inspired outlines.
Chapter 5: Introducing Circuit Components
- Selecting Circuit Components:
- Identify circuit components such as resistors, capacitors, and transistors. Download or create vector representations of these elements.
- Placing Components Strategically:
- Integrate the selected circuit components into the PCB portrait, placing them strategically to enhance the overall composition.
Chapter 6: Designing Circuit Patterns
- Creating Custom Circuit Patterns:
- Use Photoshop brushes or custom shapes to design intricate circuit patterns within the outlined areas of the portrait.
- Blending Modes and Opacity:
- Experiment with blending modes and opacity settings to seamlessly integrate the circuit patterns with the grayscale portrait.
Chapter 7: Adding Color Accents
- Choosing a Color Scheme:
- Select a color scheme that complements the grayscale tones. Consider futuristic or tech-inspired hues like electric blue, neon green, or metallic silver.
- Applying Color to Circuit Components:
- Add color accents to the circuit components, creating a vibrant contrast against the grayscale background.
Chapter 8: Incorporating Light and Shadow Effects
- Creating Light Sources:
- Identify imaginary light sources within the artwork. Use brushes or gradients to simulate highlights and shadows on the PCB-inspired elements.
- Enhancing Dimensionality:
- Apply lighting effects strategically to enhance the three-dimensional appearance of the PCB portrait.
Chapter 9: Fine-Tuning and Refining Details
- Refining Circuit Patterns:
- Zoom in and refine the details of the circuit patterns. Ensure consistency and coherence in the placement of traces and components.
- Adding Texture Overlays:
- Introduce subtle texture overlays to mimic the tactile quality of a physical PCB. Experiment with grunge or metallic textures for authenticity.
Chapter 10: Exporting and Showcasing
- Saving Your Work:
- Save your Photoshop document to preserve layers for future edits.
- Exporting for Presentation:
- Export the PCB portrait in the desired format (JPEG, PNG) for showcasing on digital platforms, portfolios, or print.
Chapter 11: Exploring Variations and Styles
- Experimenting with Different Portraits:
- Apply the PCB-inspired technique to various portraits, exploring different styles and visual narratives.
- Pushing Creative Boundaries:
- Challenge yourself by incorporating additional elements, experimenting with color schemes, or exploring unconventional compositions.
Conclusion:
Creating a Printed Circuit Board (PCB) portrait in Photoshop is a dynamic exploration of the intersection between technology and artistic expression. This comprehensive tutorial has equipped you with the tools and techniques to embark on your own journey of PCB-inspired digital artistry. Illuminate your creativity, push the boundaries of conventional design, and let your imagination flow as you transform portraits into captivating works of digital ingenuity. Embrace the synergy of art and technology, and witness the emergence of a new dimension in your digital design portfolio.


