Mastering Creativity: A Comprehensive Guide to Understanding Layer Masks in Photoshop
Introduction:
Adobe Photoshop stands as a beacon of creativity, offering an extensive toolkit for digital artists and photographers. Among its myriad features, layer masks emerge as a powerful and versatile tool, providing unparalleled control over the visibility and transparency of individual layers. In this in-depth guide, we will explore the nuances of layer masks in Photoshop, demystifying their functionality, and equipping you with the knowledge to unlock a new realm of creative possibilities.
Understanding the Basics:
Before delving into the intricacies of layer masks, it’s essential to grasp the fundamental concept. A layer mask is a grayscale image attached to a layer that controls the transparency of the layer. In simpler terms, it allows you to hide or reveal portions of a layer without permanently altering the original image. The shades of gray in the mask correspond to the transparency levels of the layer: white reveals, black conceals, and shades of gray offer varying degrees of transparency.
Creating Layer Masks:
- Basic Mask Creation:
- To create a layer mask, select the layer you want to mask.
- Click the “Add Layer Mask” icon at the bottom of the Layers panel. This adds a white layer mask, revealing the entire layer.
- Converting Selections to Masks:
- You can convert selections into layer masks by making a selection and clicking the “Add Layer Mask” icon. The selected area becomes visible, while the unselected area becomes transparent.
Working with Layer Masks:
- Painting on Layer Masks:
- Use the Brush tool with black or white as the foreground color to paint on the layer mask. Painting with black hides portions, while painting with white reveals them.
- Gradient Masks:
- Apply gradients to layer masks for smooth transitions between visible and hidden areas. This is particularly useful for blending images or creating gradual effects.
- Texturizing with Brushes:
- Experiment with textured brushes when painting on layer masks to introduce organic and artistic elements. This is especially effective for adding depth and character.
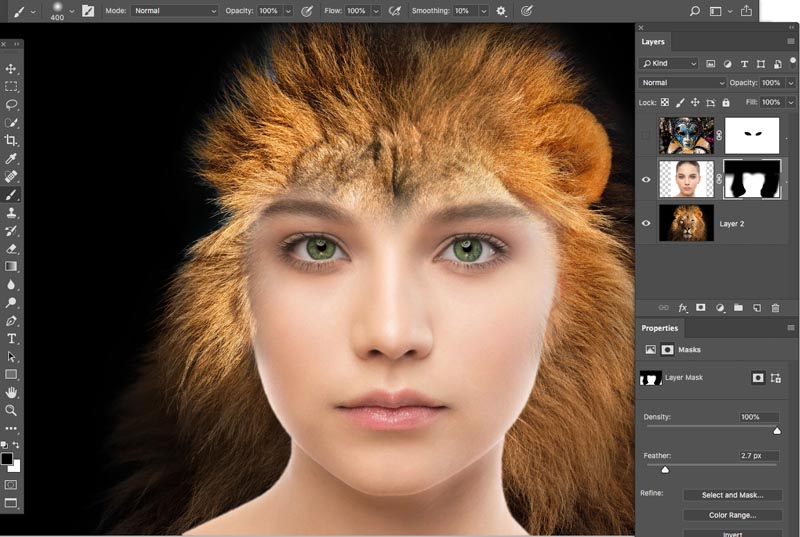
- Blending Multiple Images:
- Layer masks excel in seamlessly blending multiple images. Stack images on separate layers, use layer masks to reveal or hide portions, and refine the composition with precision.
Advanced Techniques:
- Channel Masks:
- Utilize specific color channels to create complex masks. Load a channel as a selection and convert it into a layer mask for intricate control over specific color tones.
- Blend If Option:
- Access the “Blend If” option in the Layer Style dialog to control the visibility of a layer based on underlying or overlapping layers. This feature offers nuanced blending options.
- Applying Filters to Masks:
- Apply filters directly to layer masks to achieve unique effects. Blur or sharpen masks to control the transition between visible and hidden areas with subtlety.
- Grouping and Nesting Masks:
- Group layers and nest masks to organize and streamline your workflow. This allows for more complex compositions without cluttering the Layers panel.
Common Pitfalls and Troubleshooting:
- Overlooking Mask Edges:
- Pay attention to the edges of your layer masks. Feather or refine the edges to avoid harsh transitions, especially when blending images or applying masks to portraits.
- Mismatched Resolutions:
- Ensure that the resolution of your layer mask matches the resolution of the layer it is applied to. Mismatched resolutions can result in pixelation or loss of detail.
- Forgetting to Disable Masks:
- When applying filters or adjustments, disable layer masks temporarily to view the changes on the entire layer. This helps in assessing the impact of the adjustments.
Practical Applications:
- Selective Adjustments:
- Use layer masks to selectively apply adjustments, such as contrast, saturation, or brightness, to specific areas of an image.
- Creative Compositing:
- Seamlessly blend multiple images to create composite scenes. Layer masks enable precise control over which elements are visible or hidden, ensuring a cohesive composition.
- Non-Destructive Editing:
- Embrace non-destructive editing by utilizing layer masks. This allows you to experiment freely without altering the original image, preserving the flexibility to refine your edits.
Conclusion:
Layer masks in Photoshop represent a gateway to unparalleled creative control. Whether you’re a seasoned digital artist, a photographer, or a design enthusiast, understanding the intricacies of layer masks elevates your capabilities to manipulate and enhance images with finesse. From the basics of creating masks to advanced techniques for blending and texturing, layer masks empower you to sculpt your digital canvas with precision. As you embark on your creative journey with Photoshop, consider layer masks not merely as tools but as brushes in your palette, allowing you to paint your imagination onto the digital canvas with unparalleled depth and sophistication.