Nostalgic Resurgence: Crafting an 80s Retro Text Effect with Photoshop
Introduction:
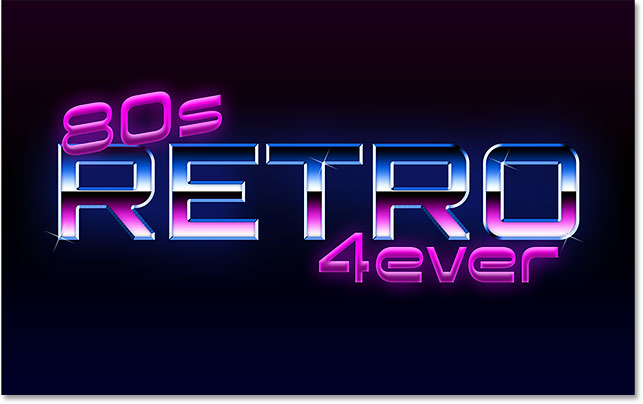
The 1980s marked an era of bold aesthetics, vibrant colors, and futuristic designs. In the realm of graphic design, the 80s retro style continues to captivate audiences with its distinct visual language. One way to channel the essence of this iconic era is by creating an 80s Retro Text Effect using Adobe Photoshop. This comprehensive guide will walk you through the step-by-step process, unlocking the secrets to infusing your text with the neon-soaked, synthwave vibe that defined the 80s.
Setting the Visual Tone:
Before diving into the creation process, it’s crucial to understand the key visual elements that define the 80s retro style. Think neon lights, bold geometric shapes, and vibrant gradients. The color palette is often dominated by electric blues, pinks, purples, and vibrant hues that scream nostalgia. Keep these characteristics in mind as you embark on crafting your 80s-inspired text effect.
Creating the Canvas:
Open Photoshop and create a new document to serve as your canvas. Consider dimensions that align with your project goals, whether it’s a social media graphic, poster, or digital art piece. The 80s style often embraces larger canvases to accommodate bold typography and intricate details.
Choosing the Right Font:
Font selection is pivotal in capturing the essence of the 80s. Opt for bold, sans-serif fonts that exude a futuristic vibe. Fonts reminiscent of arcade games, synthwave album covers, or retro movie titles are excellent choices. Experiment with different styles and sizes until you find the perfect typographic fit for your 80s Retro Text Effect.
Layering the Background:
Create a background layer that sets the stage for the neon-infused atmosphere. Gradients are quintessential to the 80s aesthetic, so consider blending vibrant hues using the Gradient tool. Experiment with linear or radial gradients to achieve the desired visual impact. This background layer serves as the canvas for your text to shine.
Applying the Base Text:
Use the Text tool to add your desired text onto the canvas. Choose a color that complements the background and enhances readability. Ensure the text is large and bold to capture the attention-grabbing nature of 80s design. Once satisfied, rasterize the text layer to enable dynamic effects.
Adding Neon Glow:
The hallmark of the 80s Retro Text Effect is the neon glow that surrounds the text. Double-click on the text layer to access the Layer Style panel. Navigate to the Outer Glow option and choose a vibrant neon color. Adjust the opacity, size, and spread to achieve a glow that makes the text pop against the background.
Introducing Glowing Lines:
To further amplify the neon aesthetic, incorporate glowing lines that trace the contours of the text. Create a new layer above the text layer and, using the Brush tool, draw lines around the text edges. Apply a neon color and experiment with brush opacity to achieve a subtle yet impactful glowing effect. This step adds depth and dynamism to your 80s text.
Embracing Chromatic Aberration:
Chromatic aberration, a visual distortion common in analog technology, is a characteristic feature of 80s design. Duplicate the text layer, offset the duplicates slightly, and apply different color tones to each layer. This creates a subtle chromatic aberration effect, enhancing the retro authenticity of your text.
Layering Geometric Shapes:
The 80s aesthetic is synonymous with bold geometric shapes. Introduce rectangles, triangles, or circles around the text, using vibrant neon colors. Create a new layer for each shape and experiment with blending modes to integrate them seamlessly into the design. This layering of geometric shapes adds a futuristic and dynamic dimension to the text effect.
Fine-Tuning with Noise and Grain:
To simulate the analog texture of 80s visuals, add a layer of noise or grain to the entire composition. Create a new layer, fill it with a neutral color, and apply a noise or grain filter. Adjust the opacity of this layer to introduce a subtle texture that harks back to the analog era.
Experimenting with Blending Modes:
Enhance the overall visual appeal by experimenting with blending modes for different layers. Blending modes determine how layers interact with each other, offering a range of visual effects. Modes like Screen, Overlay, or Color Dodge can intensify the neon glow and create captivating color interactions.
Adding Retro Typography Elements:
Embrace additional typography elements that evoke the 80s style. Consider adding retro-inspired lines, dots, or patterns around the text. Experiment with different layer styles and blending options to seamlessly integrate these elements, contributing to the overall nostalgia-inducing vibe.
Saving and Exporting:
Once satisfied with your 80s Retro Text Effect, it’s time to save and share your creation. Save the Photoshop (.PSD) file to retain all layers, styles, and editability. For sharing or use in other projects, export your design as a high-quality image file (.JPEG, .PNG) to showcase the vivid colors and dynamic typography.
Conclusion:
Crafting an 80s Retro Text Effect with Photoshop is a journey through a time capsule of bold aesthetics and futuristic design. By incorporating neon glows, geometric shapes, and nostalgic elements, you can transport your audience back to the iconic era of the 1980s. Whether you’re designing digital art, posters, or social media graphics, this technique allows you to channel the spirit of the 80s in a visually captivating way.
So, immerse yourself in the neon-soaked world of 80s design, experiment with layer styles and geometric shapes, and watch as your text transforms into a vibrant and nostalgic masterpiece. With Photoshop as your creative tool, the 80s Retro Text Effect becomes a testament to the enduring allure of a visually dynamic and iconic era.