Multi-Layered Mastery: Placing an Image in Multiple Text Layers in Photoshop
Introduction:
Unlocking the full potential of Adobe Photoshop often involves delving into advanced techniques that allow for intricate and visually captivating designs. One such technique that adds a layer of complexity and creativity to your projects is placing an image within multiple text layers. In this comprehensive guide, we will navigate the nuanced process, empowering you to seamlessly integrate images into diverse layers of text, opening up a world of possibilities for dynamic and engaging visual compositions.
Setting the Stage:
Before embarking on the technical journey, conceptualize the narrative or theme you wish to convey through your design. Envision how the image will interact with the text layers, creating a cohesive and harmonious visual story. This technique is particularly powerful for projects that demand a layered and intricate approach, such as poster designs, digital art, or promotional materials.
Creating the Canvas:
Open Adobe Photoshop and start your creative endeavor by creating a new document. Choose dimensions that align with your project goals, ensuring the canvas provides ample space for both text and imagery. This blank canvas serves as the foundation upon which the multi-layered design will unfold.
Choosing Fonts and Text:
Font selection is crucial in conveying the desired aesthetic and tone. Opt for a combination of fonts that complement each other and align with your project’s theme. Consider using varying font sizes, styles, and weights to introduce diversity in the text layers. Experiment with the arrangement of the text, planning how each layer will contribute to the overall composition.
Adding Text Layers:
Activate the Text tool from the toolbar and start adding the text layers that will serve as the containers for your image. Place each piece of text on a separate layer, strategically arranging them to create the desired visual hierarchy. The flexibility of multiple text layers allows for intricate typography and design possibilities.
Placing the Image:
Select the layer where you want the image to appear and open the image you wish to integrate into the text layers. Use the Move tool to drag the image onto the canvas. Position the image layer above the text layers in the Layers panel. This layer arrangement is crucial for achieving the desired visual effect.
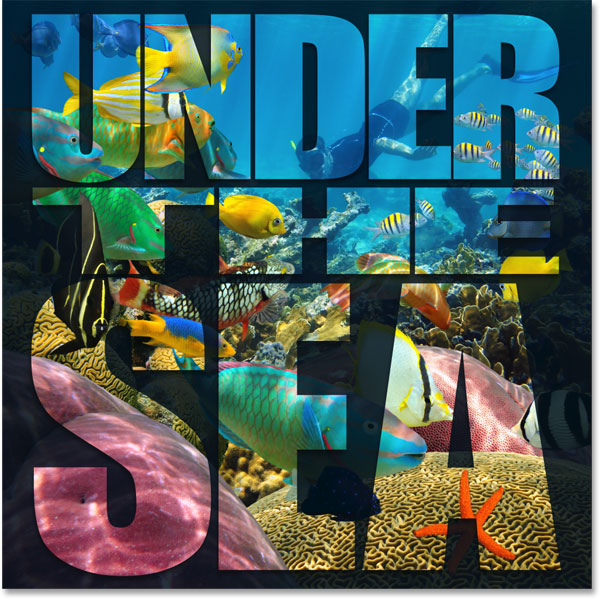
Clipping Mask Magic:
To seamlessly integrate the image into the text layers, utilize the power of clipping masks. Right-click on the image layer in the Layers panel and choose “Create Clipping Mask.” The image will now be confined within the contours of the text, creating a harmonious fusion between typography and imagery.
Fine-Tuning Image Placement:
Adjust the size and position of the image within each text layer to achieve the desired visual impact. Utilize the Transform controls (Ctrl+T or Command+T) to resize, rotate, or reposition the image. This step allows for precise customization, ensuring that the image aligns seamlessly with the unique characteristics of each text layer.
Exploring Blend Modes:
Enhance the interaction between text and image by experimenting with blend modes for the image layer. Each blend mode imparts a distinct visual effect, offering creative possibilities. Explore modes such as Multiply, Overlay, or Screen to discover captivating interactions that add depth and richness to your design.
Adding Layer Styles:
Elevate the visual appeal by applying layer styles to the text layers. Double-click on a text layer to access the Layer Style panel and experiment with options such as Drop Shadow, Outer Glow, or Bevel and Emboss. Layer styles introduce depth, dimension, and a polished finish to the text layers, enhancing the overall composition.
Incorporating Texture and Detail:
To add an extra layer of complexity and visual interest, consider incorporating textures or intricate details into the design. Create a new layer and use brushes, patterns, or overlays to introduce subtle textures or embellishments. This step contributes to the uniqueness and depth of your multi-layered composition.
Adjusting Opacity and Blurring:
Fine-tune the visibility and subtlety of the image within the text layers by adjusting layer opacities. Experiment with different opacity levels to create smooth transitions and balance between text and image. Additionally, consider applying a subtle blur effect to the image layer, enhancing the cohesion between layers and adding a touch of artistic flair.
Saving and Exporting:
Once satisfied with your multi-layered masterpiece, save the Photoshop (.PSD) file to retain all layers, styles, and editability. For sharing or use in other projects, export your design as a high-quality image file (.JPEG, .PNG) to showcase the intricate interplay between text and image.
Conclusion:
Placing an image within multiple text layers in Photoshop is a testament to the program’s versatility and your creative prowess. By seamlessly integrating imagery into diverse layers of text, you unlock a realm of possibilities for captivating and dynamic visual storytelling. Whether you’re designing intricate posters, artistic digital compositions, or promotional materials, this technique allows for a unique and layered approach to graphic design.
So, immerse yourself in the world of multi-layered design, experiment with text arrangement and image integration, and watch as your creative vision unfolds in a visually stunning narrative. With Adobe Photoshop as your creative ally, the fusion of text and image within multiple layers becomes a testament to the boundless potential of digital design and storytelling.


