Mastering Bulleted Lists in Microsoft Word: A Comprehensive Guide
Introduction: Bulleted lists are a versatile and effective way to organize information, highlight key points, and improve readability in Microsoft Word documents. Whether you’re drafting a report, creating a presentation, or formatting a resume, mastering the art of bulleted lists can enhance the structure and visual appeal of your content. In this comprehensive guide, we’ll explore the techniques, tips, and tricks for creating bulleted lists in Microsoft Word like a pro. From basic formatting options to advanced customization features, this guide will equip you with the knowledge and skills to create polished and well-structured documents that effectively communicate your message.
Understanding Bulleted Lists: Before we dive into the application process, let’s understand what bulleted lists are and how they can benefit your documents:
- What is a Bulleted List?
- A bulleted list is a series of items or points presented in a concise and organized format.
- Each item in the list is preceded by a bullet symbol, such as a dot, a dash, or a checkmark, which helps to visually separate and emphasize each point.
- Benefits of Using Bulleted Lists:
- Enhanced Readability: Bulleted lists break up large blocks of text and make information easier to digest, improving readability and comprehension.
- Visual Hierarchy: Bulleted lists allow you to emphasize key points and create a visual hierarchy within your document, drawing attention to important information.
- Organized Structure: Bulleted lists provide a structured format for presenting information, making it easier for readers to scan and locate specific details.
- Improved Engagement: Bulleted lists help to maintain reader interest by presenting information in a clear and concise manner, reducing the cognitive load and facilitating quick understanding.
Now that you understand the benefits of bulleted lists, let’s explore how to create them in Microsoft Word.
Step-by-Step Guide to Creating Bulleted Lists: Follow these steps to create bulleted lists in Microsoft Word:
- Open your Document:
- Launch Microsoft Word and open the document where you want to insert the bulleted list.
- Place Cursor Where You Want the List:
- Click on the location in the document where you want to start the bulleted list.
- If you want the bulleted list to be part of an existing paragraph, place the cursor at the end of the paragraph.
- Insert a Bulleted List:
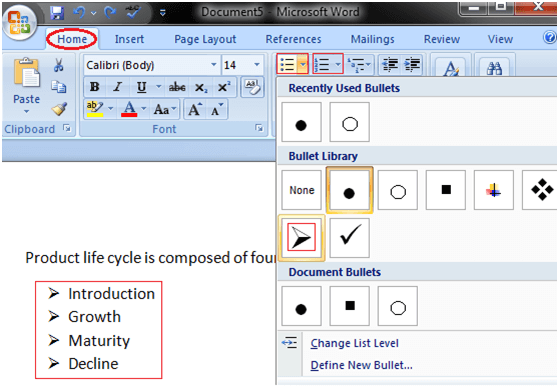
- Click on the “Home” tab in the top menu bar to access the formatting options.
- In the “Paragraph” group, you’ll find the “Bullets” button. Click on the downward arrow next to the “Bullets” button to view the list of bullet styles available.
- Select the desired bullet style from the list. Microsoft Word offers a variety of bullet styles, including dots, dashes, arrows, and custom symbols.
- Once selected, Word will automatically insert a bullet symbol at the beginning of the line, indicating the start of the bulleted list.
- Enter List Items:
- Start typing your list items after the bullet symbol. Press the “Enter” key after each item to create a new bulleted point.
- Word will automatically insert a new bullet symbol at the beginning of each line as you type, maintaining the bulleted list format.
- Customize Bulleted List:
- To customize the appearance of the bulleted list, such as changing the bullet style or adjusting the indentation, you can use the “Bullets and Numbering” dialog box.
- Right-click on any bulleted item in the list to display the context menu. Then, select “Bullets and Numbering” from the menu to open the dialog box.
- In the “Bullets and Numbering” dialog box, you can choose from a variety of bullet styles, change the size and color of the bullets, adjust the indentation and spacing, and more.
- Click “OK” to apply your changes and close the dialog box.
- Format List Items:
- You can apply formatting to individual list items, such as changing the font style, size, color, or alignment.
- Simply select the text you want to format, and use the formatting options available in the “Font” group on the “Home” tab.
- Create Nested Lists (Optional):
- To create nested lists, where one list is indented beneath another list item, you can use the “Increase Indent” button.
- Place the cursor at the beginning of the line you want to indent, and click on the “Increase Indent” button in the “Paragraph” group on the “Home” tab.
- Word will indent the line and convert it into a sub-point beneath the previous list item.
- Add Additional Formatting (Optional):
- You can further enhance the appearance of your bulleted list by adding additional formatting, such as bold or italic text, bullet point colors, or background shading.
- Experiment with different formatting options to create a visually appealing and well-organized list.
Tips for Creating Professional Bulleted Lists: Here are some additional tips for creating professional-looking bulleted lists in Microsoft Word:
- Keep it Concise:
- Keep your bulleted lists concise and focused, using short and clear sentences or phrases to convey each point.
- Avoid overcrowding the list with too much information, as this can overwhelm the reader and diminish the effectiveness of the list.
- Use Parallel Structure:
- Maintain consistency and parallel structure throughout your bulleted list by starting each item with the same grammatical form (e.g., all sentences or all phrases).
- This helps to ensure clarity and readability and makes it easier for readers to follow along.
- Prioritize Information:
- Use bullet points to highlight the most important or relevant information, placing key points at the beginning or end of the list for maximum impact.
- Consider using bullet point hierarchy, such as numbering or indenting, to indicate the sequence or priority of each item.
- Choose Appropriate Bullet Styles:
- Select bullet styles that complement the tone and purpose of your document, whether it’s formal, informal, academic, or professional.
- Avoid using overly decorative or distracting bullet styles that may detract from the readability of the list.
- Preview and Proofread:
- Before finalizing your document, preview the bulleted list to ensure that the formatting, alignment, and spacing are consistent and correct.
- Proofread the list for any spelling or grammatical errors, and make any necessary revisions or corrections before sharing or printing the document.
Conclusion: Bulleted lists are a valuable tool for organizing and presenting information in a clear, concise, and visually appealing manner in Microsoft Word documents. By following the step-by-step guide and implementing the tips and tricks provided in this comprehensive guide, you can create professional-looking bulleted lists that effectively communicate your message and engage your audience. Whether you’re creating reports, presentations, or other types of documents, mastering the art of bulleted lists will enhance the structure and readability of your content, making it more impactful and memorable for your readers. So, take advantage of the formatting options available in Microsoft Word, unleash your creativity, and create stunning bulleted lists that elevate the quality and presentation of your documents with confidence and flair.