Mastering the Liquify Tool: A Comprehensive Guide to Using the Liquify Tool in Adobe Illustrator
Introduction: The Liquify Tool in Adobe Illustrator is a versatile feature that enables designers to distort, reshape, and manipulate artwork with fluidity and precision. Whether you’re retouching images, creating organic shapes, or adding dynamic effects to illustrations, the Liquify Tool offers a wide range of possibilities for enhancing your artwork. In this extensive guide, we’ll explore the step-by-step process of using the Liquify Tool in Adobe Illustrator, covering everything from basic distortion techniques to advanced creative applications, with practical tips and creative insights along the way.
Part 1: Understanding the Liquify Tool
- Introduction to Liquify: The Liquify Tool in Adobe Illustrator allows users to distort and manipulate artwork by pushing, pulling, twirling, and bloating pixels. It offers a non-destructive way to transform objects and shapes while preserving their underlying structure.
- Uses of Liquify: Liquify is commonly used for tasks such as retouching photos, creating caricatures, and adding organic shapes and effects to illustrations. It provides flexibility and control for artists and designers to explore creative possibilities in their artwork.
Part 2: Accessing the Liquify Tool
- Opening the Liquify Panel: To access the Liquify Tool in Adobe Illustrator, navigate to the “Effect” menu, then choose “Distort & Transform” and select “Liquify.” This will open the Liquify panel, where you can adjust various distortion options.
- Using the Liquify Tool: With the Liquify panel open, select the object or artwork you want to distort, then use the Liquify Tool options to apply various distortion effects. Experiment with different settings to achieve the desired result.
Part 3: Applying Basic Distortions
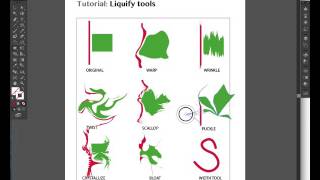
- Push and Pull: Use the Push and Pull tools in the Liquify panel to push or pull pixels in the selected artwork. Click and drag on the artwork to deform and reshape it according to your preferences.
- Twirl and Pucker: Experiment with the Twirl and Pucker tools to create swirling and puckering effects in the artwork. Adjust the size and strength of the tools to control the intensity of the distortion.
Part 4: Exploring Advanced Techniques
- Freeze and Thaw: Utilize the Freeze and Thaw tools in the Liquify panel to selectively protect areas of the artwork from distortion. Use the Freeze tool to lock pixels in place, and the Thaw tool to release them for further manipulation.
- Bloat and Scallop: Experiment with the Bloat and Scallop tools to create bloating and scalloping effects in the artwork. Adjust the brush size and pressure to control the extent of the distortion.
Part 5: Tips for Optimization and Efficiency
- Using Pressure Sensitivity: If you’re using a pressure-sensitive graphics tablet, take advantage of pressure sensitivity to control the intensity of the Liquify Tool. Apply lighter pressure for subtle distortions and heavier pressure for more pronounced effects.
- Using Masks and Layers: Apply Liquify effects to specific areas of the artwork by using masks and layers in Adobe Illustrator. Create a separate layer for the artwork you want to distort, then apply the Liquify effect to that layer while keeping other elements unaffected.
Conclusion
The Liquify Tool in Adobe Illustrator is a powerful feature that offers endless possibilities for distorting and manipulating artwork with precision and creativity. By mastering the techniques and tips outlined in this guide, you’ll be equipped with the knowledge and skills to create stunning distortions and effects in your artwork. Remember to experiment, practice, and explore new techniques to continually refine your Liquify Tool skills in Adobe Illustrator. With dedication and creativity, you can leverage the Liquify Tool to push the boundaries of visual expression and create artwork that captivates and inspires.


