Navigating Your Call History: A Step-by-Step Guide to Checking the Last Six Months
Introduction:
Keeping track of your call history can be crucial for various reasons, whether it’s for personal record-keeping, business purposes, or simply to reminisce about conversations with loved ones. While mobile devices offer convenient ways to access call logs, the process might vary depending on the device and service provider. In this detailed guide, we’ll walk you through the step-by-step process of checking your call history for the last six months, providing insights for both Android and iOS users and offering tips for navigating different service providers.
Android Users:
Step 1: Open the Phone App
- Unlock Your Phone:
- Begin by unlocking your Android device using your preferred method, such as a password, PIN, or fingerprint.
- Locate the Phone App:
- Find the Phone app on your home screen or in the app drawer. The icon typically resembles a phone receiver or a green phone icon.
- Tap to Open:
- Tap on the Phone app to open it. Once opened, you’ll see the interface displaying recent calls, contacts, and other options.
Step 2: Access Call History
- Navigate to Call History:
- Look for the option labeled “Call History,” “Recent Calls,” or a similar term. This is where your call logs are stored.
- Select Time Period:
- In the call history section, there may be an option to filter calls based on time periods. Look for a dropdown menu or settings icon that allows you to choose the last six months.
- Review Call Logs:
- Once you’ve selected the desired time frame, you can scroll through your call history to review calls made or received over the last six months.
iOS Users:
Step 1: Open the Phone App
- Unlock Your iPhone:
- Unlock your iPhone using your passcode, Touch ID, or Face ID.
- Locate the Phone App:
- Find the Phone app on your home screen. The icon is green and resembles an old-fashioned telephone receiver.
- Tap to Open:
- Tap on the Phone app to open it. The interface will display various tabs, including “Favorites,” “Recents,” “Contacts,” and more.
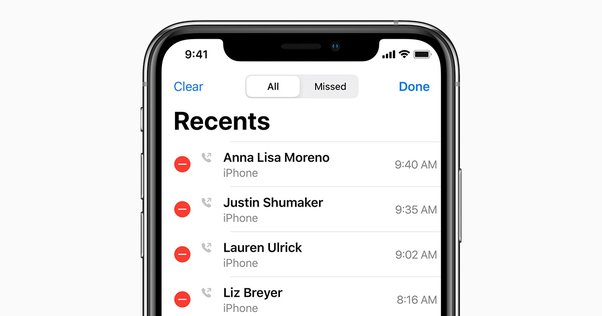
Step 2: Access Call History
- Navigate to Recent Calls:
- Tap on the “Recents” tab at the bottom of the screen. This section contains your call history.
- Adjust Time Frame:
- Look for an option that allows you to adjust the time frame of your call history. On some devices, you may need to tap “All” or a similar option to reveal time-based filters.
- Select the Last Six Months:
- Find and select the option that allows you to view calls from the last six months. The interface may provide different time frame options, such as “All,” “Missed,” “Outgoing,” and a custom date range.
- Review Call Logs:
- After selecting the last six months, scroll through the list to review your call logs during that period. You can see details such as the contact name, phone number, date, and duration of each call.
Tips for Different Service Providers:
Verizon:
- Visit the Verizon Website:
- Log in to your Verizon account on the official website using your credentials.
- Access Call Details:
- Navigate to the “My Verizon” section and find the option for viewing call details. This may be located under the “Usage” or “Billing” section.
- Select Time Frame:
- Look for an option to specify the time frame. Choose the last six months to view your call history.
AT&T:
- Log in to AT&T Account:
- Access your AT&T account by logging in on the official website.
- Navigate to Call History:
- Find the section labeled “Call History” or “View Usage Details” within your account dashboard.
- Set Time Period:
- Look for filters or settings that allow you to set the time period. Choose the last six months to view your call history.
T-Mobile:
- Access T-Mobile Account:
- Log in to your T-Mobile account on the official website.
- Go to Usage Details:
- Navigate to the “Usage Details” or “Call History” section within your account dashboard.
- Specify Time Frame:
- Look for options to specify the time frame for your call history. Select the last six months to view relevant details.
General Tips:
- Check Device Settings:
- Explore the settings on your mobile device for additional options related to call history. Some devices may have specific settings for call logs.
- Backup and Restore:
- Consider backing up your call history regularly to avoid data loss. Both Android and iOS devices offer backup and restore options that include call logs.
- Contact Customer Support:
- If you encounter difficulties accessing your call history, reach out to your mobile service provider’s customer support for assistance. They can guide you through the process based on your specific needs.
Conclusion:
Checking your call history for the last six months is a straightforward process that can vary slightly depending on your mobile device and service provider. By following the step-by-step instructions provided for both Android and iOS users, along with tips for different service providers, you can easily access and review your call logs. Whether for personal record-keeping or other purposes, staying familiar with your call history adds a layer of convenience and organization to your mobile experience.


